Vivid
Online Documentation - Last modified: 10. Apr 2014
00. FAQ
How do I change theme colors
Go to Apperance > Customize > Colors & Icons.
There you can change all theme colors.
How to add Google Adsense code
Go to Theme options > Advertising. Paste your Google Publisher ID in the first field and your Google Ad unit ID in the second field. Then choose a ad spot that you want to display your Google ads and check the shortcode or HTML code like Adsense field and paste your code in the field then save options.
How to add Google Analytics tracking code to your website
Go to Theme options scroll down until you see Google Analytics field paste your tracking code in the field and save options.
How to upload a favicon
Go to Apperance > Customize > General find favicon field > click upload new > select a favicon(16x16px) that you want to use and save.
SEO plugin support
Go to Theme options > find SEO plugin support check this to give an SEO plugin control of meta description, title and open graph tags. We recommend using SEO plugin by YOAST.
How to hide search in header
Go to Apperance > Customize > Header find Show search in Menu choose off to remove the search input from the header and save.How to change post & page layout
Go to Apperance > Customize > Post & Pages find post & page layout in the top. Select the layout you want and save.
How to disable share buttons
Go to Apperance > Customize > Post & Pages and find show share buttons field and choose off to disable share buttons.
How to change Icons
Go to Apperance > Customize > Colors & Icons. Here you can choose different icons you want to display, and change their colors.
01. Wordpress Installation
Before you start messing things up and making things harder for yourself, you really should take a deep breath and read some of these resources, honestly this will help you, we only care for your well being!
Here's a great video by WooThemes on how to install Wordpress
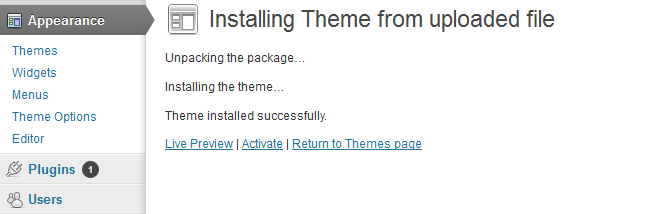
02. Theme installation
Installing
To install the theme use the theme installer in the WordPress administration. Go to Appearance > Themes and click on the tab Install Themes. Choose upload. Click on Browse..., select the vivid.zip theme file and click Install Now.
Activating
After successfully installing the theme click on the Activate button. You can also go to Appearance > Themes and click on Activate were the newly installed theme is located.
Troubleshooting
- Open vivid.zip file and unpack all theme files to a directory on your computer.
- Using FTP, upload this directory to the /wp-content/themes directory of your WordPress installation on your server.
- Go to Appearance > Themes in the WordPress administration and the new theme will appear in the overview of installed themes.
- Click on Activate to activate the newly installed theme
Are you migrating from another theme?
If you are upgrading your site you might want to consider using a plugin to regenerate all the images for your old posts. Vivid uses a specific set of thumbnail sizes and you can easily convert your images with a plugin like this one
03. Theme Customization
Vivid uses the built in Wordpress Customizer, to go there and set up your theme, go to Appearance > Customize,from there you can edit tons of things in Vivid on the fly, you can see the changes appear in the iframe besides the menu.
You can also edit some other options that aren't related to the aesthetic portion of the theme in Appearance > Theme Options (such as Google Ads & Adspots)
04. Menu
We have a pretty cool menu going on in Vivid, this is how you use it.
Go to Appearance > Menus and make a new menu.
To make the menu appear to the left of all pages (the primary menu) check the "Primary Menu" checkbox at the bottom of it to make it appear there
To make the menu appear besides the logo, at the top, check the "Top Header Menu" checkbox at the bottom to make it appear there.
To put an icon in the primary menu you just need to press the menu item and select "Choose Icon" there you can select the icon of your choice.
05. Custom Widgets
Our custom widgets are very easy to use, but here is a step-by-step on how to put them, and where they go.
We offer you seven widgetized areas, so the first one is Home Sidebar. That's the sidebar that displays on the front-page (or your default blog). The one below that one is Home Sidebar (Sticky), this is where things get interesting. You can place any widgets in that sidebar and they'll stick to the screen when the user scrolls down. The other widget areas pretty much explain themselves so I won't go into that (same "rules" apply)
There's also a "Home Sidebar", "Page Sidebar", "Post Sidebar" and "Footer Widgets" areas.. these.. well do exactly what you think they do, they are displayed in the defined areas in the theme.
Open up Appearance > Widgets and you should see our widgets just laying around there, waiting for some action.

Here's a list of our widgets as of v1.0
- Bluth Author
- Bluth Categories
- Bluth Featured Post
- Bluth Flickr
- Bluth Google ADS
- Bluth Google+ Badge
- Bluth HTML
- Bluth ImageBox
- Bluth Instagram
- Bluth Likebox
- Bluth Newsletter
- Bluth Social Widget
- Bluth Social Counter
- Bluth Tabs
- Bluth Tweets
06. Shortcodes
We've included our custom shortcode plug-in called BluthCodes!
If you have another shortcode plug-in watch out that it doesn't conflict with ours, you should be alright though.
Our shortcodes are:
- Divider
- Social
- Alert
- Label
- Badge
- Well
- Button
- Blockquote
- Tooltip
- Popover
- Accordion
- Progress Bar
We also have column layouts a la Bootstrap
- two_first
- two_one_first
- two_one_second
- one_two_first
- one_two_second
- three_first
- three_second
- three_third
- four_first
- four_second
- four_third
- four_fourth
- one_one_two_first
- one_one_two_second
- one_one_two_third
- two_one_one_first
- two_one_one_second
- two_one_one_third
- one_two_one_first
- one_two_one_second
- one_two_one_third
There are buttons for every one of these included in the Editor where you post your pages and posts, click on that button and all the options for each one will be included. You can also check out how to use them on our demo page where there are more detailed instructions
07. Translations
This theme is translatable. The translation files .po/.mo are located in the inc/lang directory in the Vivid theme folder. To translate the theme you have to use a specific translating program like POEdit
Here's a simple video by AJ Clarke showing how to do just that
08. Updating the theme
There are two ways to update your theme to the latest version.
- Wordpress upload method
- FTP method
Wordpress Method
- Download the latest version of the theme from Themeforest
- Unzip the main file to your computer
- In the unzipped folder there is another zip file called Vivid.zip, unzip that file as well to a folder of your choice
- Login to your wordpress admin panel and navigate to Appearance > Themes
- First we have to get rid of the old theme and to do that we have to activate another theme
- Click the activate button for some other theme like the wordpress default "Twenty Twelve" theme that comes with wordpress
- After the other theme has activated click the Delete button below the Vivid theme
- Now you can install and activate the new theme like normal
FTP method
- Download the latest version of the theme from Themeforest
- Unzip the main file to your computer
- In the unzipped folder there is another zip file called vivid.zip, unzip that file as well to a folder of your choice
- Open your ftp program like Filezilla and connect to your server.
- If you don't know your login details your hosting provider can help you get them.
- Then navigate to your themes directory usually something like public_html/wp-content/themes/
- Drag and drop the Vivid folder you just unzipped from the vivid.zip file to the theme folder on your server
- Filezilla will show a dialog warning you that the files you are trying to move to the server already exist, check the "Overwrite" radio button and also check the "Apply to current queue only" checkbox.
- Click OK and the files will start uploading and overwriting the old ones.
- Login to your website admin panel when uploading is finished and make sure the theme is updated by going to Appearance Themes and checking the version number.